The recommended way to install WUDSN IDE is the WUDSN IDE Installer. It is available for Windows 64-bit, macOS and Linux.
If you use another operating system, want to use an older version of WUDSN, or wish to install assemblers, compilers, and emulators more selectively, read the descriptions of the installation steps below. In case something is not correct or not working, please get in touch with me.
- Installing Eclipse
- Installing WUDSN IDE
- Installing Assemblers and Compilers like ATASM, MADS, XASM...
- Installing Altirra, Atari800, and Other Emulators
- Creating and Building the Example Project
- Further Information on Assembly Programming
Installing Eclipse
- Download Eclipse from https://www.eclipse.org/downloads.
- If you don't know which version to take, use Eclipse 4.12 Platform Runtime Binary (81 MB) for WUDSN IDE 1.7.1 and newer. Use Eclipse 4.3.2 Platform Runtime Binary (61 MB) for WUDSN IDE 1.7.0 and older.
This minimum-size installation does not include the Java Development Toolkit (JDT). WUDSN IDE does not depend on the JDT but on the Java Runtime Environment (JRE). Ensure you also have the 64-bit version of the JRE installed if you want to use the 64-bit version of Eclipse. - Unzip the downloaded archive file and store the " eclipse " folder where you want Eclipse to be located on your local hard drive.
- Start the Eclipse executable from that folder.
- Upon the first start, you are prompted to specify the folder where the workspace shall be located.
- Normally, a start link is created to this end. You can use the parameter "-nl" to specify the locale. Use "en_US" for English or "de_DE" for German. Example: "C:\Program Files\Eclipse\4.12\eclipse\eclipse.exe" -Xmx512M -nl en_US"
- Creating the workspace folder in your home directory is recommended.
- After you have read the welcome page and got familiar with the Eclipse UI, switch to the Resource perspective.
- Open the view "Problems" via the menu "Window/Show View/Problems" and then click the entry "Configure Contents..." from its view menu.
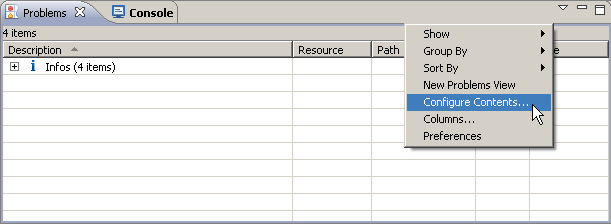
- Select the configuration "All Errors", the radio button "On selected element and its children", and the checkboxes "Error", "Warning", and "Info".

- Now Eclipse is ready, and you can proceed with Installing WUDSN IDE.
Installing WUDSN IDE
- Start Eclipse
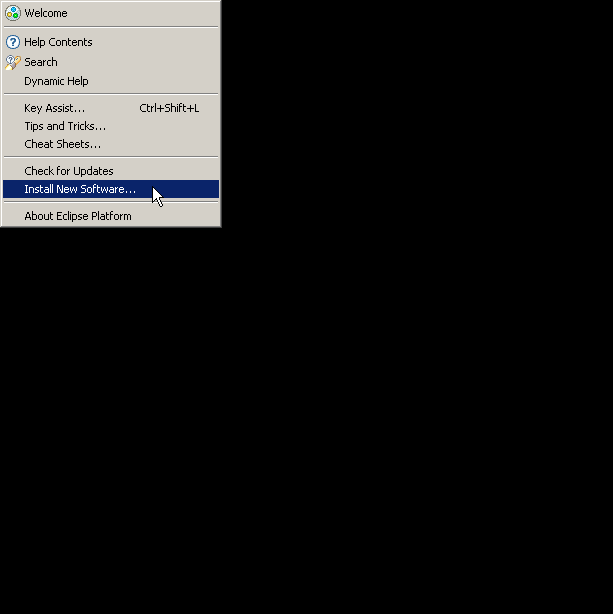
- Select the entry "Install New Software..." from the menu "Help".
- Enter "https://www.wudsn.com/update/stable" in the "Work with" field and press ENTER.
- Select the latest version of the feature "WUDSN IDE" for in and press "Next".
You don't need to install the "General Eclipse Enhancements" feature as it is already included in the "WUDSN IDE" feature". - Review the installation details and press the button "Next".
- Read the license agreement, choose "I accept..." and press the " Finish " button.
- If you get a security warning that the content is unsigned, confirm the alert by pressing the " OK " button.
- When prompted to restart Eclipse now, press the " Yes " button.
- Updates may fail for whatever reason, or the installed version has severe issues. For example, the required Java version might not be available on your machine. In this case, uninstall it via the link "What is already installed" in the "Install New Software..." dialog and restart the IDE. Then, you can reinstall the latest version from "https://www.wudsn.com/update/stable" or previously released versions from the locations listed on the Releases page.
Installing Language Packs
- The Eclipse runtime is, by default, installed with the English language pack. Additional language packs can be downloaded from
Installing Assemblers and Compilers like ATASM, MADS, XASM...
- Start Eclipse
- Select the entry "Preferences" from the menu "Window" (in Windows and Linux) or the menu "Eclipse" (in Mac OS X)
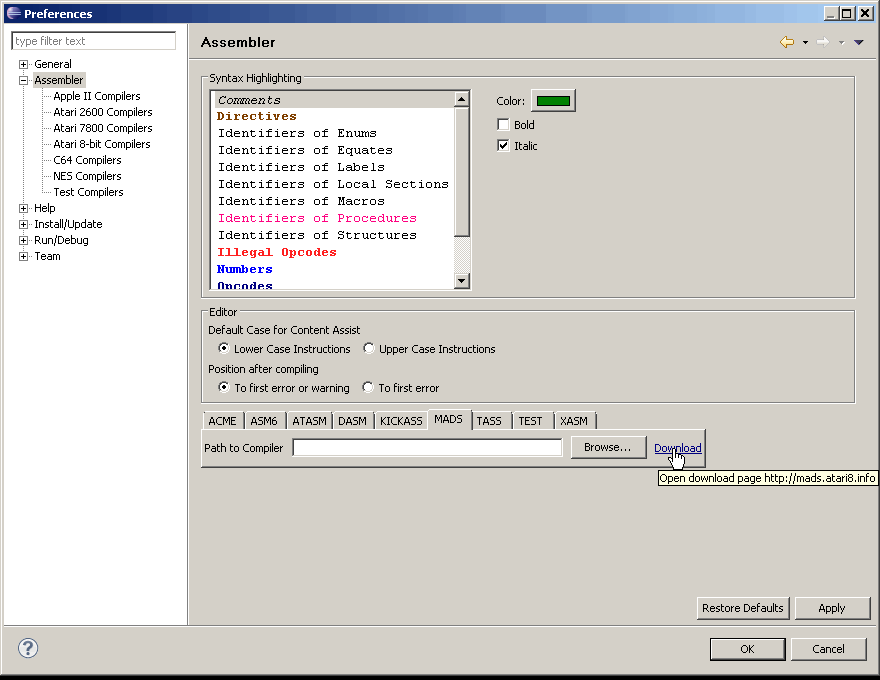
- Open the preferences page "Languages/Assembler/Atari 8-bit Assemblers" or the respective page for your platform.
- Select the tab for the assembler or compiler of your choice. The following assemblers and compilers are or will be supported:
Language Tool Default Target Platform Assembler ACME C64 Assembler ASM6 NES Assembler ATASM Atari 8-bit Assembler DASM Atari 2600 Assembler KickAss C64 Assembler MADS Atari 8-bit Assembler XASM Atari 8-bit Assembler TASS C64 (in preparation) Pascal MadPascal Atari 8-bit - There are three ways to download the assemblers/compilers:
- Option 1: Download the complete assemblers/compilers/emulators package for WUDSN IDE, including the Windows, Linux, and macOS X versions where available. This is the simplest way to get all of them for many operating systems. The archive contains a readme file with the date of the last update and the included program versions.
- Option 2: Download single assemblers/compilers from https://github.com/peterdell/wudsn-ide-tools. Use this option if you prefer only to download what you need.
- Option 3: Click the "Download" link to open the home page of the assembler/compiler. Use this option if you need the most recent version of the assembler/compiler.
- Follow the instructions on the download site to install the assembler/compiler in the folder of your choice.
- In the section "Browse..." button for the field "Path to Compiler" to locate the executable.
- The default parameters are used if no explicit assembler/compiler parameters are specified.
- The default parameters are ignored if explicit assembler/compiler parameters are specified.
- The absolute path to the source file replaces the variable "${sourceFilePath}".
The absolute path to the output file replaces the variable "${outputFilePath}".
For more variables, see the "Preferences for assembling and compiling" section on the "Features" page. - Choose the source or temporary folders as the output folder.
- Choose the file extension for the output file, for example, ".xex" or ".bin".
- Press the button "OK".
- All values are reset using the "Restore Defaults" button, except for the paths to the assembler/compilers.
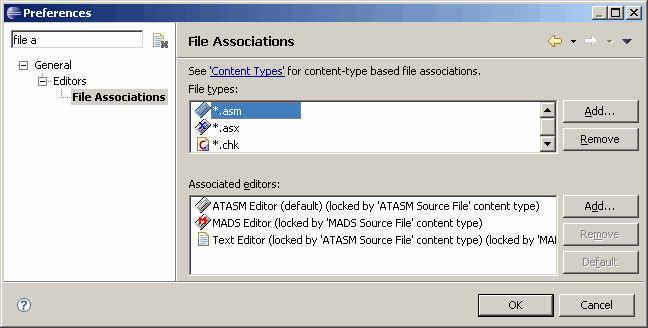
- Using the button "Default" in the "File Associations" preferences, you can set the default editor for a file extension, for example, "MADS" for "*.asm".
Installing Altirra, Atari800, and other emulators
- Start Eclipse.
- Select the entry "Preferences" from the menu "Window" (for Windows and Linux) or "Eclipse" (for Mac OS X).
- Open the preferences page "Languages/Assembler/Atari 8-bit Assemblers" and select the tab for your assembler.
- The field "Default Application to open Output File" is defaulted to "Operating System Default Application".
- Suppose you have the emulator registered as the default application for the extension of the output file, for example, "Altirra", "Atari800," or "Atari800MacX" for ".xex". In that case, you don't need to configure anything in addition and can skip the steps below.
- If your operating system, like, for example, Linux, does not support default applications or if you need a particular output file extension and particular parameters to open the output file in the emulator, you can choose the emulator in the field "Application to open Output File" and configure the command line on the corresponding tab.
- You can also use the "User Defined Application" to open the output file with an arbitrary application like a script, linker, or whatever.
- Suppose you have not yet downloaded the corresponding emulator. In that case, you can use the download link on the tab of the emulator and follow the instructions on the download site to install the emulator.
- Use the "Browse..." button for the "Path to Application" field to locate the executable. Specify your command line based on the default command line displayed.
Note: Under Mac OS-X, you must specify the path to the actual executable inside the ".app" folder. To see this path, select "Show Package Contents" in the context menu of the ".app" folder. For the "Stella" emulator installed in the "/Applications/Stella.app" folder, this means "/Applications/Stella.app/Contents/MacOS/Stella". - The default command line is used if no explicit command line is specified.
- If an explicit command line is specified, the default command line is ignored.
- The variable "${runnerExecutablePath}" is replaced by the path to the application executable.
The absolute path to the output file replaces the variable "${outputFilePath}".
For more variables, see the "Preferences for assembling and compiling" section on the "Features" page. - Press the button "OK".
- If you also need the Atari ROM files, you can find them in the file PCXF380.ZIP, which is available at http://www.emulators.com.
Creating and Building the Example Project
- Start Eclipse.
- Select the entry "New/Project" from the menu "File".
- Select the wizard "General/Project" and press the button "Next".
- Enter the project name "Atari800" and press "Finish".
- The new project will appear in the "Project Explorer".
- Select the newly created project and open its context menu.
- Select the entry "New/File", enter the file name "Example.asm", and press the button "Finish".
- The new empty file will now be opened in the MADS editor.
- Copy the following source text and paste it into the file:
; WUDSN IDE Atari Rainbow Example - MADS syntax

      org $4000 ;Start of code

start lda #0 ;Disable screen DMA
      sta 559
loop  lda $d40b ;Load VCOUNT
      clc
      adc 20 ;Add counter
      sta $d40a
      sta $d01a ;Change background color
      jmp loop

run start ;Define run address - Select the entry "Build and run" from the menu "Language" or press "SHIFT-CTRL-9".
- Enjoy your famous first rainbow effect.
- In case of problems, open the view "Problems" and the output of the "Console" view for details and post a message with the screenshots in the English AtariAge forum if you get stuck:
