The!Cart Studio
Welcome to "The!Cart Studio", the free cartridge image authoring tool for The!Cart, Atarimax Maxflash Cartridges, and free-style binary cartridge images. The program enables you to create workbooks for cartridge images that contain one or more ROMs or executables. The workbook can then be exported in different formats. Besides plain binary images for use with an EPROM or external flash programming device, emulator cartridge images to run the cartridge in emulators, and flash programming disk images that can be booted or loaded directly from the Atari to flash the target flash module. It would be best if you had a device and software that is capable of transferring the data from your PC to the Atari, like, for example, SIO2PC (available here and here ) with AspeQt or SIO2SD. For "The!Cart", you do not need a USB programmer device or other PC-related hardware for programming. "The!Cart Studio" can also create header-free binary export files for a workbook. You burn or flash them to any cartridge, for example, using a USB programmer.

You can watch the YouTube video presentation to understand how it works and what it looks like. You should read this English manual carefully to learn the details and features. If you have questions regarding "The!Cart" or "The!Cart Studio", you can contact me directly or post in the "The!Cart" thread on AtariAge (English) or the ABBUC Forum (German).
Downloading the Program
This is version 2026-03-28 12:52:00
of the program. Click here to download the latest version of the program. The download is a single ".zip" archive file containing operating system-specific archives and a standalone ".jar" file. Extract the system-specific archive for your operating system into a folder of your choice.

Starting the Program
"The!Cart Studio" is implemented in Java, making it compatible with all popular operating systems. To run the program, you must install the Java Runtime Environment (JRE) or the Java Development Kit (JDK/SDK) with version 1.8 or later. "The!Cart Studio" requires enough RAM for the Java process to export images. The amount of available RAM is displayed in the "About" dialog. It should be twice the size of the cartridge you want to export. So, for a 128 MB "The!Cart" export, the program requires at least 256 MB of RAM. You can specify this when you start from the command line via "java -Xmx256M -jar TheCartStudio.jar". By default, "The!Cart Studio" checks for an update at startup. The check runs in the background and does not affect startup time. You can turn off this check in the options.
For your convenience, native wrapper applications are provided. They set the required Java memory parameters.
Windows
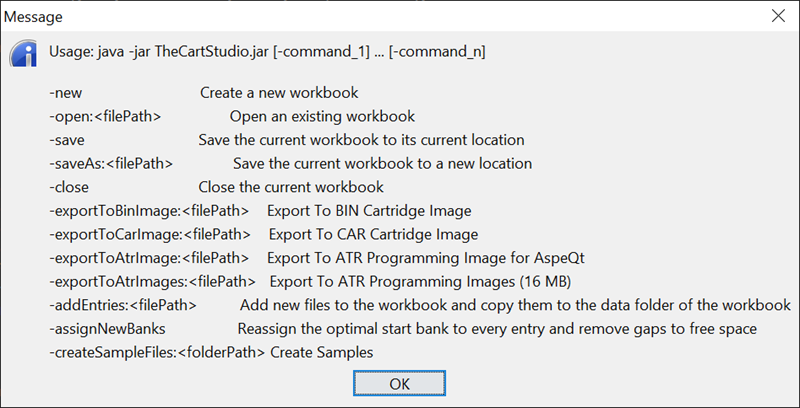
Double-click "TheCartStudio.exe" to start the program. Alternatively, the following parameters are supported when running from the command line.
Linux
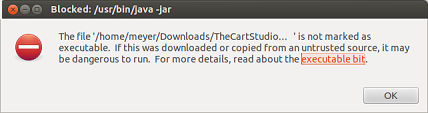
After extracting the "TheCartStudio.sh" file from the download archive, the so-called "executable bit" should already be set. If not, you will see the following error when double-clicking the files.
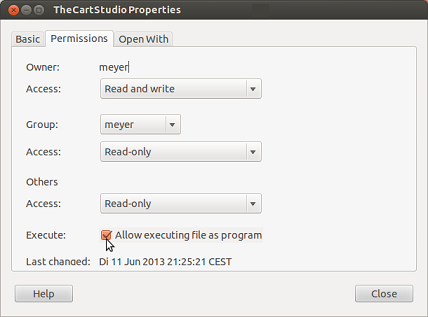
Open the file properties and set the executable flag as shown below for the file.
You can run the "TheCartStudio.sh" script from the terminal or via the "Run as a Program" entry in the context menu of your file explorer. If you get an error message like "Exception in thread "main" java.lang.UnsatisfiedLinkError: Can't load library: /usr/lib/jvm/java-17-openjdk-amd64/lib/libawt_xawt.so", you have the headless version of the JDK installed. You need the version that supports UIs as well. Run "sudo apt install openjdk-17-jdk" to install a complete JDK.
macOS
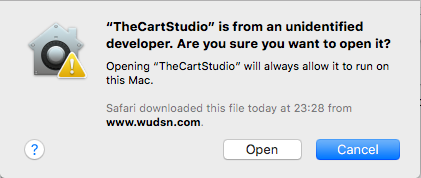
The folder "TheCartStudio.app" in the download is a native package that contains a small Java stub, the "TheCartStudio.jar", and some additional configuration files. You can start the app directly from the Finder. It also sets Java's -Xms and -Xmx parameters to the required values to overcome the default of only 128MB of heap space. Upon the first start, you must open the app directly from the Finder via the "Open" entry in the context menu. Then you must confirm the "TheCartStudio is from an unidentified developer. Are you sure you want to open it?" warning by pressing the "Open" button and authenticating the action with an administrator user.
General Usage
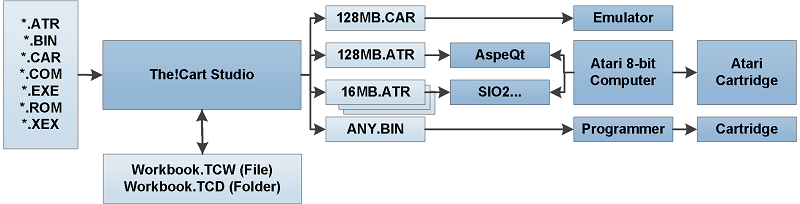
The "The!Cart" enables you to create workbooks for cartridge images that contain one or more ROMs or executables. The workbook can then be exported in different formats. Besides, plain binary images (".BIN", ".ROM") for usage if an EPROM or external flash programming device, emulator cartridge images (".CAR") to run the cartridge in emulators, and flash programming images (".ATR") which can be booted or loaded directly from the Atari to flash the target flash module. Depending on your disk emulation, you can export the workbook as a single large programming disk image for use with AspeQt or as multiple 16 MB sized programming disk images for use with SIO2SD, SIO2USB, or similar SIO device emulators. You can also export cartridge images in plain binary (".BIN") to burn or flash them to any cartridge using a programmer device.
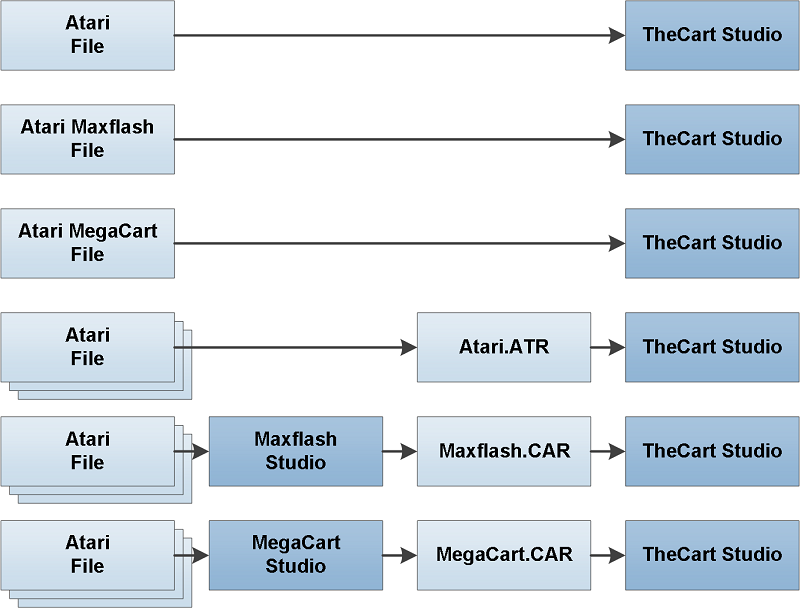
In case you are creating workbooks for "The!Cart", you can make use of the native cartridge emulation feature and reuse the existing software for the "Atari Maxflash" cartridge and "MegaCart". This means you can, on the one hand, directly use existing compilations and add them as a single file. On the other hand, you can use Maxflash Studio and MegaCart Studio to create new compilations and images for these cartridges and then add them as a single file. Because the Extended Menu of "The!Cart" also recognizes the menu systems of these two cartridge systems, it can optionally offer you the entries within these menus directly.
Using different studios with their specific loaders can be particularly useful when adding ATR disk images. No 100% accurate emulation of standard disk handling is possible when loading from ROM cartridges. Any ATR emulation must use at least a small amount of the computer's RAM. If a program uses this RAM area while loading from the cartridge, the loader will be overwritten, and the program will crash. Details on the different methods used can be found in the ATR Disk Images section. The following table gives an overview of the features supported by the individual loaders. With this information, you can decide which loader might be the right one for you.
| Loader |
Approach |
Compatible with Programs using the RAM under the OS |
Supports Disk Swapping |
Supports Poke and Patches |
| Maxflash Studio |
Modified Atari OS in RAM |
No |
Yes |
No |
| MegaCart Studio |
Modified Atari OS in RAM |
No |
Yes |
No |
| The!Cart Studio |
Modified ATR Disk Image |
Yes |
No (planned) |
Yes |
User Interface
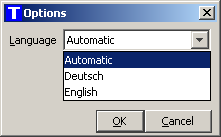
The user interface of "The!Cart Studio" is localized and currently comes with English and German screen texts. You can change the display language via the "Tools/Options..." menu entry. The default value is "Automatic", meaning the language is determined by the operating system's language settings.
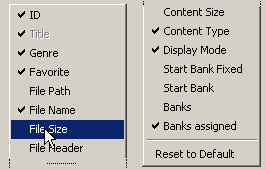
Only the most frequently used columns are displayed in the various tables by default. You drag & drop to change the order of the columns. Clicking on the column header with SHIFT or CONTROL held down extends the sort order by appending this column. This way, you can sort by genre and title, for example. Clicking a column header without pressing SHIFT or CONTROL resets the sort order to that single column. You can also use the context menu to hide visible columns, unhide invisible columns, reset visibility, and sort order to the default. All layout changes are saved automatically when you close the program. This also applies to the size and position of the main window, as well as to the different folders used for loading/saving workbooks, adding entries, and exporting cartridge images.
All relevant commands have a key binding, so you can use your keyboard to control the program.
Creating Workbooks
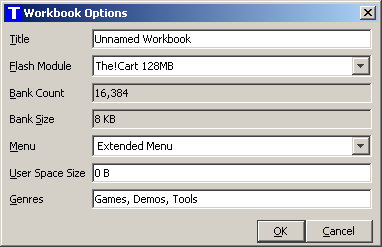
In the "File" menu, you can find the usual "New", "Open", Save", "Save As", and "Close" actions. When "The!Cart Studio" is opened, and a new unnamed project is prepared. You can display the dialog to edit the workbook options via the "Edit/Workbook Options..." menu entry.
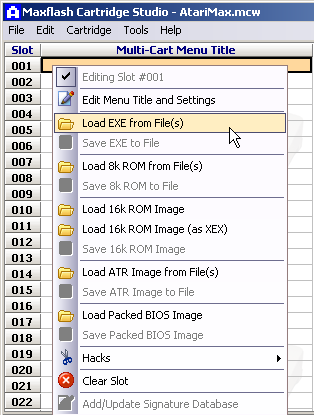
Adding Entries
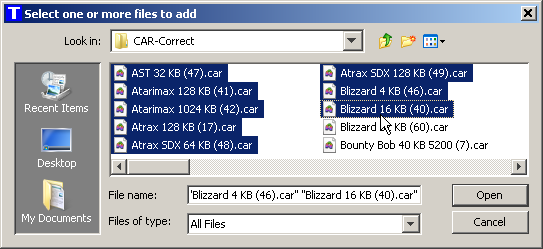
You can add files for new entries via the "Edit/Add Entries..." menu entry. The file chooser has multi-selection enabled, which means you can select multiple files at once and add them in one go. Alternatively, you can use drag & drop to drop one or multiple files onto the window to add entries.
"The!Cart Studio" contains a database of popular ROMs and will assign the correct title automatically based on size and the CRC32 checksum of the file. If no matching entry is found in the data, the title of the workbook entry is defaulted from the file name by removing the file extension.
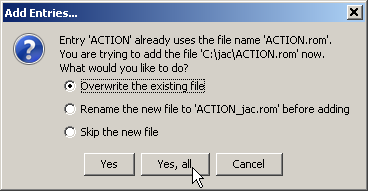
When new files are added, they remain at their original location first. When you save the workbook, all newly added files will be copied into the workbook's data folder (".tcd"). This way, you have all the files and the workbook together in one location. Consequently, a file in the workbook is uniquely identified by its case-insensitive file name, irrespective of the folder it was originally copied from. Adding files with the same name results in a confirmation dialog that lets you overwrite the existing file in the data folder with the new file, rename the file automatically during copying, or skip the new file, leaving the existing file in the data folder unchanged. The choice can apply to the current file only or to the current and all subsequent files.
Entry Properties
The information for every entry is displayed in the table's columns on the "Entries" tab. Only the most important columns are visible by default. They are listed in bold in the table. You can configure the visibility and order of the columns as described in the section General Usage. Columns listed as editable can be read only for specific entries depending on the workbook entry type or other conditions.
| Column |
Editable |
Description |
| Line |
No |
The line number in the table. |
| Type |
No |
The type of the workbook entry. Possible values are:
- File
This workbook entry was added via the standard "Add Entries..." action by selecting a file that is now part of the workbook. The workbook entry and content of the file will be exported when the workbook is exported.
- User Space
This workbook entry was added via the "Add User Space Entry..." action by selecting a file that is now part of the workbook. User-space entries can only be added if user space is reserved in the workbook options. A user space entry is exported as a single menu entry only and points to a bank in the User Space that is not maintained from "The!Cart Studio".
|
| Title |
Yes |
The title of the workbook entry in the extended menu. It must be specified and unique within the workbook, as it serves as the basis for the search in the extended menu. The title length is limited to 40 characters and must use only characters in the Atari computer's character set. The title is set to the default value from the built-in cartridge database when the workbook entry is added. If no entry is found in the database, the title is set to the name of the newly added file. |
| Genre |
Yes |
The genre of the workbook entry. Genres like "Games", "Demos", or "Tools" can be defined in the workbook options. Every entry can optionally be assigned to a genre. There are three ways to do this. First, by typing in the name of the genre on the keyboard. Second, by choosing the genre from the drop-down list of the field. Third, via the action "Set Genre..." in the "Edit" menu. Using the "Set Genre..." action, you can set or clear the genre for all selected entries at once. If an entry is not assigned to a genre, it will only be on the "All" tab of the extended menu. If a type is assigned to a genre, it will appear on the "All" tab and the genre tab. |
| Favorite |
Yes |
If you set the favorite indicator for a workbook entry, the initial list of entries in the extended menu only shows the favorites for the active genre. This way, you can use the joystick or cursor keys to select from a restricted list of entries. When you start typing a search term, the favorite indicator becomes irrelevant, and all entries are searched for the search term. |
| File Path |
No |
The source file path for newly added and unsaved entries. Once the workbook is saved, the file will be copied from the source path to the workbook's data folder, and the source path will be cleared. |
| File Name |
No |
The file name of the workbook entry uniquely identifies the workbook entry within the workbook and the data folder. |
| File Size |
No |
The exact file size of the file is displayed in bytes. |
| File Header |
No |
The file header type of the file. Possible values are:
- None
The file does not have a specific file header that describes its content. The complete file content is considered relevant data for "The!Cart". You have to select the proper content type manually.
- Cartridge
The file is a ".CAR" file that includes an additional header describing its contents. Only the part of the file after the header is considered relevant for "The!Cart". The workbook entry's content type is automatically set and cannot be changed manually.
|
| Content Size |
No |
The size of the relevant content in the file. For files with a header type of "None", the file size equals the file size. For files with another header type, it is the file size minus the header size. |
| Content CRC32 |
No |
The CRC32 checksum of the content. This checksum is used to identify information in the cartridge database. You will sometimes also find this checksum when people try to identify which ROM or version of a ROM they have. |
| Content Type |
Yes |
The content type of the workbook entry. The content type controls how "The!Cart" and the extended menu interpret the binary content behind the workbook entry. To start an entry correctly, the correct content type must be set. If you add entries with a "Cartridge" file header, the content type is determined automatically and cannot be changed manually. If you add a plain binary file, "The!Cart Studio" will default the content type based on the file size. If more than one content type matches the file size, select the correct one from the field's drop-down list. The content types and associated file sizes are available in the "Content Types Overview" dialog. The dialog can be opened via the "Help/Content Types" menu. |
| Display Mode |
Yes |
The display mode for the workbook entry. Possible values are:
- Single Entry
The workbook entry is a single menu entry in the extended menu. The workbook entry title is used as the workbook entry title in the extended menu.
- Multiple Entries
This value can only be selected if the file behind the workbook entry contains a menu supported by "The!Cart Studio". The inner menu entries are extracted from the file during the workbook export. Only the titles of the inner menu entry, but not the title of the workbook entry, will appear in the extended menu.
|
| Parameters |
Yes |
The parameters are relevant for entries with the "ATR - Atari Disk Images" content type. They contain the information required to modify the disk image content so it can run from "The!Cart" instead of a disk drive. When you add an entry based on a disk image, "The!Cart Studio" automatically determines the default parameters. You can change them manually if the disk images do not work correctly with the defaults. To restore the defaults, add the disk image file again. For more information on the parameters, see File Format and Content Type. |
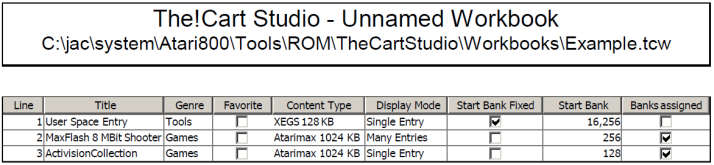
| Start Bank Fixed |
Yes |
By default, "The!Cart Studio" arranges the data for the entries of a workbook automatically. This is done according to a strategy that keeps the positions of existing entries stable as long as there is enough free space. Together with the incremental flashing feature of the flashing software, this helps keep the time required to update "The!Cart" short. Suppose you are a developer creating software specifically for "The!Cart" or even creating other arbitrary binary exports with "The!Cart Studio". In that case, you may want to have control of the order and position of the workbook entry data in the export. The corresponding field in the "Start Bank Fixed" checkbox becomes editable when the "Start Bank" checkbox is set. "The!Cart Studio" will then use the specified start bank for the workbook entry and will not rearrange it if space on the cartridge runs out. |
| Start Bank |
Yes |
The bank where the content for the workbook entry is placed. "The!Cart Studio" automatically determines and manages the start bank by default. Selecting the "Start Bank Fixed" checkbox makes this field editable and allows you to specify a fixed value manually. |
| Banks |
No |
The number of banks the workbook entry will occupy on the cartridge. |
| Bank Assigned |
No |
This checkbox indicates that the required banks for the workbook entry could be assigned correctly. If there is insufficient continuous space for the banks of the workbook entry left on the cartridge, the "Banks Assigned" checkbox will not be set. Saving the workbook is possible, but exporting the workbook is disabled. You can use the menu "Edit/Reassign Banks" to reorder all entries to minimize gaps and free up more space. |
File Format and Content Type
Several file formats are supported when adding entries. To properly handle the ROM-specific bank switching scheme, every entry must know its content type. For those file formats where the content type cannot be determined automatically, for example, because there are multiple possible options, you have to select it in the "Content Type" column. The input help in the "Content Type" column is automatically filtered based on the file length and content. So, it only offers the potentially matching content types. In addition, some file formats are even automatically converted before they are added to the workbook. Saving the workbook is possible at any time, even if there are entries with unknown content types. When the workbook is exported, the content type for all entries must be present. Here is a description of the supported file formats and how they are handled.
| File Format |
Description |
| CAR Cartridge Image |
This is the recommended format for adding ROM files. It is also by emulators. It contains a header with the exact type of the ROM file and a checksum to verify its integrity. This enables emulators to run the file without prompting the user for the exact content type each time. Similarly, it allows "The!Cart Studio" to automatically determine the content type, so you don't have to choose something, and the content type is not editable in this case. |
BIN Cartridge Image
ROM Cartridge Image |
This is the regular dump format for ROM files. It does not contain information on the type of flash module or the required bank switching to run it. Based on the file size, the "Content Type" column is restricted to those values that represent ROM with the exact file size. For example, a file with precisely 1 MB of data could be "Atarimax 1MB", "Mega Cart 1MB", "XEGS 1MB", or "Switchable XEGS 1MB". If you also want to use your ROM files in an emulator, converting the plain ROM file into a ".CAR" file is advisable. All popular emulators have this function built in. This way, you don't have to choose the correct flash module type at every start. |
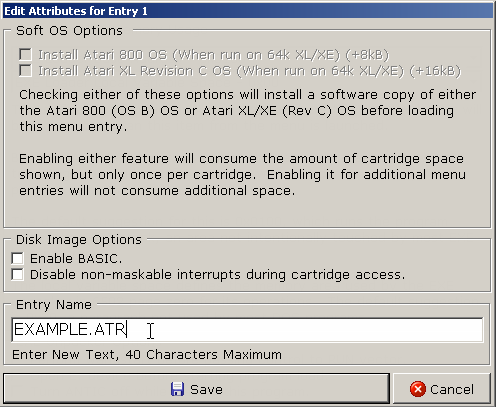
| ATR Programming Images |
Collections created with the Maxflash Studio are sometimes available as "ATR Programming Images" instead of "BIN" or "ROM" cartridge images. They are bootable disk images that contain the program to flash the "Atarimax Maxflash" cartridge directly from the Atari. They cannot be run or tested in an emulator. These programming images are recognized by "The!Cart Studio". When you add such a file as an entry, it is first converted to a ".CAR" cartridge image, which is saved in the programming image's folder. If the ".CAR" file already exists in that folder, it will be overwritten. The new ".CAR" file is added to the workbook. This way, you can even run and test the content of the ".CAR" cartridge image in an emulator before flashing. |
| ATR Disk Images |
This is the standard Atari disk image format emulators use. Many disk-based programs in this format can also be started from flash cartridges. However, there are some natural limitations arising from the fact that loading ATR images requires simulating the SIO routines that are in the ROM of the original Atari OS. For example, the simulation code must be loaded into RAM and may be overwritten when loading from the ATR disk image begins. In addition, the banks of the flash cartridge have to be activated during the SIO operation to load the data of the ATR disk image.
Consequently, a program that uses a display list, graphics, or interrupts in the cartridge memory area will run into problems. Also, programs that attempt to write data to disk will fail when run in an ATR simulation. Two approaches are used for the simulation: Modified ATR Disk Images and Modified Atari OS in RAM. Which method works best depends on the ATR disk image and its programs.
Modified ATR Images
This is the approach used by the "Extended Menu" of "The!Cart". When you add an ATR file directly to a workbook, the file is analyzed, and all potential code locations that call the Atari OS SIO routines are identified. For disks that contain a known DOS (DOS 2.0S, DOS 2.5, MyDOS) and its "DOS.SYS" file, only the sectors that belong to that file are patched by default. For disks that contain the Bootmanager by Mike Langer, only the sectors of the Bootmanager are patched. For all other disks, the entire disk is scanned for SIO usage, which may result in false positives. In this case, you must manually remove the patch from the parameters. The result of this analysis is stored in the "Parameters" column as "base=$100, $123=SIOV, $456=DSKINV". This column is hidden by default and can be shown via the context menu. When the workbook is exported to the Atari, the calls at the found offsets are modified to point to the SIO simulation placed at the address specified with the "base=$...." parameter. The advantage of this approach is that it also works on Atari 400 and Atari 800 machines that do not have RAM under the OS, and for software that uses RAM under the OS, such as "Turbo Basic XL 1.5" or "The Brundles". Specifying the corresponding parameters will work even for software that uses non-standard SIO routines instead of the Atari OS SIO routines, such as "MyPicoDOS". The disadvantage of this approach is that it will not work with programs that pack or encrypt the code that calls the SIO vectors in the ATR disk image. The following parameters are supported. Numbers are given in hexadecimal notation and are just example values. In the Compatibility Patches, you can find a list of known parameter combinations for programs that don't work with the default parameters.
base=$100
This specified the base address for the SIO simulation code, which is less than 256 bytes in size. The default base address is $400. If the ATR disk image crashes while loading, it may be that the program overwrites this memory area. For example, MyPicoDOS uses the memory location $400-$40f during loading. To solve this problem, you can change the base address to $410. Other good choices for base addresses are $100, $400, $480,$500, and $600. Just try which one works for the specific program.$123=SIOV
The two bytes starting at offset $123 are changed to the start address of the emulation code for the SIOV vector ($e459).$123=<SIOV
The byte at offset $123 is changed to the low byte of the start address of the emulation code for the SIOV vector ($e459).$123=>SIOV
The byte at offset $123 is changed to the high byte of the start address of the emulation code for the SIOV vector ($e459).$123=DSKINV
The two bytes starting at offset $123 are changed to the start address of the emulation code for the DSKINV vector ($e453).$123=<DSKINV
The byte at offset $123 is changed to the low byte of the start address of the emulation code for the DSKINV vector ($e453).$123=>DSKINV
The byte at offset $123 is changed to the high byte of the start address of the emulation code for the DSKINV vector ($e453).$123=SELECTEDITEMNUMBER
The two bytes at offset $123 are changed to the memory location, which contains the item number of the selected menu entry. This can be used to modify inner menus so that selection is skipped and the chosen entry is started automatically. The item numbers are counted starting at zero. For example, if you select the menu entry representing the 3rd item on a disk-based ATR disk image, the values in the memory location will be "2".
If you messed up the parameters somehow, you can add the ATR disk image again to the workbook and choose to overwrite the existing file in the workbook. The analysis is performed again in this case, and a parameter default is generated.
The SIO simulation in this approach supports both the read ("R", $52) and the status ("S", $53) command for "D1:". The status command sets the three density bits of the "DVSTAT" status based on the density and size of the ATR disk image. Using other disk units than "D1:" results in the error code "130 - Nonexistent Device". Using commands other than "R" and "S" results in the error code "132 - Unknown command".
Modified Atari OS in RAM
This is the approach used by the "Atarimax Maxflash" Menu or the "MegaCart" Menu. The operating system is copied to RAM under the OS ROM, then modified to load "disk sectors" from the flash cartridge instead of the actual disk. The advantage of this approach is that it works equally for all software that uses the standard Atari OS SIO vectors, even if the SIO-relevant code on the ATR disk image is packed and encrypted. The disadvantage is that the approach will not work on machines like the Atari 400 or Atari 800 that do not have RAM under the OS, and not with programs that use the RAM under the OS themselves. You can use the Maxflash Studio or MegaCart Studio to create 128 KB, 1 MB, or 2 MB collections with ATR disk images. Both studios include proven emulation and offer several options for specifying how the disk image shall be handled. You can then export the collection as a BIN or CAR cartridge image and add it to the workbook.
|
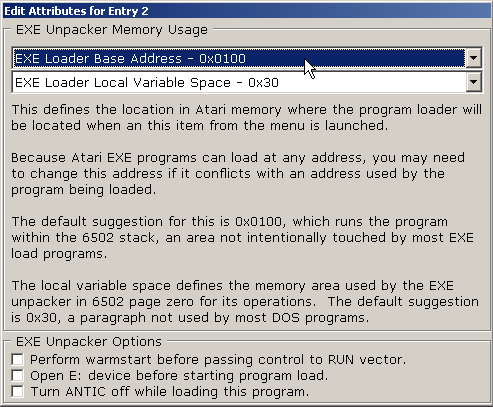
COM Executable
EXE Executable
XEX Executable |
This is the Atari DOS composite file format of executable files that can be loaded from a DOS. They can be added to "The!Cart" in three ways. All of them have advantages and disadvantages.
Directly as a single file
Executable files (COM, EXE, XEX) can be added directly to the workbook. While adding files directly is very convenient, the worst-case space wasted is 8191 bytes per file. Therefore, the options below are recommended if you add many executable files.
Included with multiple files on an ATR disk image
The most compatible and space-efficient way to run these files is to copy them with the required DOS onto a disk. It is even the only valid way for executable files that load additional data, such as fonts, from separate files. And while adding executable files directly to the workbook is possible, adding them to an ATR disk image with the Bootmanager by Mike Langer first, then adding the ATR disk image, has advantages. You can create ATR disk images representing compilations and work on actual disk drives. In addition, ATR disk images work with sectors of 128 or 256 bytes. So if multiple files are copied to one disk, at most 127 or 255 bytes of space are wasted per file. The Homesoft website contains many disk images already prepared with the Bootmanager by Mike Langer.
Included with multiple files on an "Atarimax Maxflash" or "MegaCart" cartridge
This is similar to including files on an ATR disk image. Instead of using DOS and a Bootmanager, you can use the Maxflash Studio or MegaCart Studio to create 128 KB, 1 MB, or 2 MB collections with COM/EXE/XEX executables. Both studios include proven emulation and offer several options for specifying how the executable shall be handled. You can then export the collection as a BIN or CAR cartridge image and add that to the workbook.
|
Cartridge Database
Many popular ROMs' titles and content types are stored in the cartridge database. If your ROM is found in the database, the title and, if known, the content type are proposed. If no matching entry is found, the content type is set to "Unknown", and you have to select the appropriate content type manually before exporting the cartridge in and form.
The cartridge database is based on the list by Tomasz Krasuski (Kr0tki) maintained at AtariAge. It currently contains over 700 known titles and almost 700 known content types. The exact numbers are shown in the About dialog. You can support "The!Cart Studio" and improve the quality of the cartridge database by sending your workbook file without (!) the ROMs.
Display Mode
Via the column "Display Mode", you can select how the workbook entry is represented in the extended menu. Possible values are:
- Single Entry
The workbook entry is a single menu entry in the extended menu. The workbook entry title is used as the menu entry title in the extended menu.
- Multiple Entries
This value can only be selected if the file behind the workbook entry contains an inner menu supported by "The!Cart Studio". The inner menu entries are extracted from the file during the workbook export. Only the titles of the inner menu entry, but not the title of the workbook entry, will appear in the extended menu.
The following types and versions of inner menus are currently supported. For all of them, you can add the inner menu entries to the extended menu by choosing "Multiple Entries". When you add a workbook entry, the "Display Mode" is set to "Multiple Entries" by default. You can change the values if you don't want the inner menu entries to appear separately. By default, the inner menu opens when you select an entry in the extended menu. Dedicated support has been implemented for some inner menus, so selecting an inner menu entry opens it directly.
| File Type |
Menu |
Description |
| ROM Image |
Maxflash Studio |
Multiple entries are supported for many versions of Atari Maxflash Studio. Direct start is supported for menus created with the latest version of "Maxflash Studio". |
| ROM Image |
MegaCart Studio Menu |
Multiple entries are supported for all official versions of MegaCart Studio. Direct start is supported for the menus created with the latest version of MegaCart Studio. |
| Disk Image |
Bootmanager by Mike Langer |
Multiple entries are supported for the 1996 and 2022 versions of the Bootmanager by Mike Langer. Direct start is not supported. You can find the massive archive of disk images that use the Bootmanager on the Homesoft website. |
| Disk Image |
MyPicoDOS Menu by Matthias Reichl (hias) |
Multiple entries are supported if a "PICONAME.TXT" configuration file is on the disk. Direct start is not supported. |
Previewing Workbooks
The menu entry "Tools/Preview" allows for a testing preview of the complete cartridge export and its menu in an emulator. The workbook is exported as a ".CAR" file with a fixed name into the user's temporary folder for the preview. A previously existing preview is overwritten automatically. If no path to an emulator executable is configured in the options, "The!Cart Studio" tries to open the ".CAR" file with the operating system's default program. If that fails, it will ask you to enter the full path to the emulator, for example, "Altirra.exe" or "atari800.exe", in the options.
Exporting Workbooks
Export Formats
| Export Format |
Description |
Supported Flash Types |
| BIN Cartridge Image |
Single plain binary cartridge file without header information, with exactly the size specified by the flash type. It can burn or flash the cartridge file to a physical cartridge with an arbitrary EPROM burner or flasher. You can also run the cartridge file in emulators such as Atari800, Atari800Win, or Altirra. The emulator will try to detect the cartridge type from the ROM size and content. In case of doubt, the emulator will prompt you for the correct cartridge type whenever you open the file. Therefore, using the "CAR Cartridge Image" export instead is recommended in this case. |
Atarimax 128k
Atarimax 1MB
The!Cart 128MB
User Defined |
| CAR Cartridge Image |
Single extended binary cartridge file with header information. It can be used directly to run the cartridge file in emulators such as Atari800, Atari800Win, or Altirra. The emulator will detect the cartridge type from the header, so you don't have to select it when opening the cartridge file. |
Atarimax 128k
Atarimax 1MB
The!Cart 128MB
User Defined |
| ATR Programming Image for AspeQt |
Single disk image in ATR format for use with AspeQt and the "The!Cart" flasher software on the Atari. The ATR file uses large sectors to achieve the maximum transmission speed and to store up to about 512 MB of information (65534 sectors of 8k size) in a single file. The file contains additional information to support incremental flashing, speeding up flashing when only parts of the project have been changed. In addition, the file only contains the used sectors. Therefore, this export format can also be used to program "The!Cart" cartridges smaller than specified by the flash type, as long as the size does not exceed the cartridge's physical size. |
The!Cart 128MB
User Defined |
| ATR Programming Images (16 MB) |
Multiple disk images in ATR format for use with SIO2USB, SIO2SD, SIO2PC, or AspeQt and the "The!Cart" flasher software on the Atari. The ATR files use regular double-density sectors to be compatible with SIO2USB, SIO2SD, and Atari DOS versions like MyDOS and SpartaDOS. The files contain additional information to support incremental flashing, speeding up flashing when only parts of the project have been changed. In addition, the files only contain the used sectors. Therefore, this export format can also be used to program "The!Cart" cartridges smaller than specified by the flash type, as long as the size does not exceed the cartridge's physical size. |
The!Cart 128MB
User Defined |
The export also generates a ".txt" index file with the title and origin of all menu entries. This way, you can use the file system search of your operating system function to find games in exports. The index file also contains the information that, for example, "Amaurote 128 (130 XE)" is one of the menu entries that result from the "Multiple Entries" setting for the workbook entry with the title "GAMES403" stored in "GAMES403.ATR".
Printing Workbooks
You can print the workbook's content, including the list of entries, via the menu entry "File/Print" (CTRL-P). The columns in the print output are the visible columns on the entries tab. Hence, you can configure the columns you want to see as described in the section General Usage. For example, you can make the column with the start bank visible to use the simple menu to start entries and see the banks assigned to user space entries.
Programming Flash Cartridges
The!Cart
- Plug "The!Cart" in and power on your Atari.
- Press "ESC" to leave the extended menu and enter the simple menu with the black text screen.
- Press "F" to select the built-in flasher and then "RETURN" to start it.
- The flasher will automatically detect if the attached storage device supports high-speed SIO.
- Press "1" for "Program Cartridge".
- If you use AspeQt and SIO2PC, insert the single large disk image created in the step Exporting Workbooks into the emulated drive "D1:" in AspeQt.
- If you use SIO2USB, SIO2SD, or your alternative storage device, insert the first of the nine 16 MB disk images created in the step Exporting Workbooks into the emulated drive "D1:" in AspeQt. If your storage device supports emulating multiple disk drives, insert the disk images 2-9 into the subsequent virtual drives. This way, you can leave the Atari alone longer during flashing.
- The flasher will prompt you with "drive number (1-15)".
- Press "1" and "RETURN" to start loading the data from the disk.
- The flasher will load the header information and display the workbook title, date, and number of used blocks. It indicates whether the export consists of multiple 16 MB images. In that case, you can search for further 16 MB disk images in all available drives.
- The flasher will prompt you, "Perform incremental update (y/n)?"
- Press "y" to use the incremental update.
- The flasher will prompt you with the message "Start programming (y/n)?"
- Press "y" to start the actual flashing.
- The flasher will load the checksums and determine which differences exist between the current content of "The!Cart" and the exported workbook. Only blocks that are different are loaded and updated.
- When done with programming, the flasher will prompt you with "Press any key to continue".
- Press "S" to start the cartridge.
- The flasher will prompt you with "Start Cartridge: 'E' for expert menu (y/e/n)?".
- Press "y" to start the updated extended menu.
Important Note: If "The!Cart" no longer starts after flashing...
In sporadic cases, for example, when I/O errors corrupt the first few banks of "The!Cart", you may be unable to enter the menus or the built-in flasher from "The!Cart" itself. Then you have the following options:
- Download the latest disk version of the flasher from Atari flashing software.
- Insert the "
thecart.atr" from the download archive in disk drive 1.
- Hold down the OPTION key during power-on. You will then end up in the simple menu and can try to update from there. If there is no extended menu on the cartridge, it disables itself completely, and the computer will boot from the disk.
- If even holding down OPTION does not turn off "The!Cart", hold down the SELECT key instead during power-on. The cartridge completely disables itself, and the computer will boot from the disk.
- If this does not turn off "The!Cart", you need a Turbo-Freezer or similar monitor program. With that, you can turn off "The!Cart" during power-on by writing the value $00 to address $D5A6. If you have a Turbo-Freezer, hold down the freezer button and power on the computer. Enter the debugger by pressing "D" and enter "<code>CD5A6<00</code>".
- If all this fails, you can try the strictly not recommended way and hot plug "The!Cart". This may damage your cartridge and your computer. First, boot the flasher from the disk without "The!Cart" inserted. You are prompted to press the RESET button on "The!Cart". Insert the cartridge wholly and carefully. Press the RESET button on the cartridge, then press RETURN on the computer. The flasher will report if and which cartridge was detected.
- You can flash the cartridge as described in the previous section. If the problem remains, try flashing again and answer the "incremental update" question with "n".
- Now your "The!Cart" works again. If not, feel free to contact us.
Extended Menu
Pressing the RESET button on the "The!Cart" cartridge and pressing the RESET button on your Atari will take you to the menu. If the cartridge contains the extended menu, holding OPTION while pressing RESET on the Atari starts the simple menu. This allows for creating the built-in flasher and updating the extended menu if it does not work correctly. Holding SELECT while pressing RESET on the Atari turns off the cartridge completely. This allows for starting booting the flasher from a disk drive.
You can use the joystick or the keyboard to control the extended menu. You can filter the list by selecting a genre tab. The "All" tab always contains all entries. You can narrow the list within a genre tab by typing any word or part of the menu entry title you want. The search will find the menu entry, regardless of case. You can also use the joystick and the cursor keys to scroll through the result list. You can use the following controls:
- HELP / ATARI - Display the help menu
- DELETE - Delete the last character from the search term.
- Joystick UP, cursor UP - Move the cursor line up.
- Joystick DOWN, cursor DOWN - Move the cursor line down.
- FIRE or RETURN - Start the selected entry. Lock the cartridge configuration to prevent changes.
- FIRE+SHIFT or RETURN+SHIFT - Start the selected entry. Don't lock the cartridge configuration.
- RETURN+CONTROL - Start the selected entry's cartridge menu, if there is one. Lock the cartridge configuration to prevent changes.
- RETURN+SHIFT+CONTROL - Start the selected entry's cartridge menu, if there is one. Don't lock the cartridge configuration.
- Joystick LEFT, cursor LEFT - Select the next genre to the left
- Joystick RIGHT, cursor RIGHT - Select the next genre to the right
- TAB - Toggle the details display mode of the selected entry between readable and technical information
- ESC - Exit the extended menu and start the simple menu. From there, you can also start the flasher.
CPLD Logic Updates
The most recent version of the CPLD logic for the "The!Cart" cartridge supports a configuration lock (since 2013-12-01) and the "Flash MegaCart 4 MB" mode (since 2026-03-26).
The configuration lock ensures no software can unintentionally or maliciously change the contents of the "The!Cart" cartridge. By default, the "The!Cart" configuration is locked when an entry is started. This means the configuration can no longer be changed via software until you press the "RESET" button on the "The!Cart" cartridge. You can prevent the configuration lock when starting an entry by pressing the "SHIFT" key as an additional modifier. This can be useful when using software built to access the "The!Cart" cartridge in native mode, for example, RAM disk drivers.
If you have a version of "The!Cart" cartridge that still has the older CPLD logic, you can use a JTAG interface to update the CPLD logic as described in
HOWTO: The!Cart CPLD logic update via JTAG. Note that because The!Cart Studio does not know which CPLD logic version is on your cartridge; it always assumes the latest version. If your CPLD logic is older than the mentioned update dates, the feature will not work on your The!Cart.
Advanced Topics
Several advanced features of "The!Cart Studio" that are not so interesting for the regular user are also available.
- Displaying additional columns in the "Entries" tab
Only the most frequently used columns are in the entries tab by default. You can make more columns about the workbook entry visible using the context menu on the table's header row.
- Using fixed start banks
By default, entries are assigned automatically to a suitable start bank, and the user cannot change this assignment. For developers who want to create software that uses "The!Cart" directly, for example, in "Flexi-Mode" to access the 128 MB directly, it may be required to put certain content in certain banks. To do this, use the context menu to make the column "Start Bank Fixed" visible. This column offers a checkbox; if it is active for an entry, the "Start Bank" column becomes editable for that workbook entry. The workbook entry is excluded from automatic bank assignment.
- Defining User Space
By default, all banks of the flash cartridge are under the control of "The!Cart Studio". But if you want, you can reserve a portion of the flash cartridge for direct flashing from the Atari. This portion of the flash cartridge is called "User Space". You can define the user space size in the workbook options. You can enter the size in bytes, kilobytes, or megabytes, e.g., "1023 B", "8 KB", or "2 MB". The actual user space size is rounded up to the next full bank, depending on the bank size. In addition, the user space is automatically rounded to a multiple of the flash block size, i.e., to 64 KB for the flash target types "Atarimax 128 KB/ 1 MB" and "Flash MegaCart 4 MB", and to 128 KB for "The!Cart 128 MB". The user space is always placed in the last banks of the flash cartridge. This way, the ATR programming images are shorter, and the flash software does not overwrite the user-space banks.
Though the content of the user space is entirely under the control of the Atari, you can still define entries with "The!Cart Studio" to start the content in the user space from the cartridge menu. The menu entry "Edit/Add User Space Entry" adds a new user space entry to the list. This type of entry does not have an associated file in the project. Instead, manually specifying the content type and the start bank is mandatory. Therefore, these two columns become visible if a user space entry is added.
- Using a particular version of the "The!Cart" Atari flashing software and standard menu
"The!Cart Studio" uses the Atari flashing software and the standard menu in the ".jar" file by default. Suppose you want to use a more recent or modified version of the "The!Cart" Atari flashing software and standard menu instead of the version which is currently included in "The!Cart Studio", you can put the "cartmenu.rom" file in the same folder as the "TheCartStudio.jar". Whether the built-in or the external software is used and which version it has is displayed in the "About" dialog.
Trouble Shooting
In case of problems, post your question to the forums mentioned at the beginning of this document. Frequent mistakes are
- You have used the wrong flash module type and size in the workbook options.
Ensure you set the flash module type and size to your cartridge's actual type and size. This is especially important if you did not create the workbook but downloaded it from somewhere. Other people may have different hardware than you.
- You have used the wrong menu in the workbook options.
Set the flash module type to "Extended Menu" to get the Google-like search. This is especially important if you did not create the workbook but downloaded it from somewhere. Older workbooks use the "Simple Menu".
- You have used the wrong flashing mode in the flasher.
Make sure you use "Program Cartridge" by default. You don't need to program raw files or images; they aren't required when using "The!Cart Studio". Make sure you use incremental flashing by default, if available, to save time. Non-incremental/complete flashing is only required if nothing else helps. In non-incremental flashing mode, all blocks (16 banks are one block) of "The!Cart" are explicitly erased to initialize the flash, even though the banks may have been empty already.
- You used the flasher's "E) Erase cartridge" option.
This completely erases all content in the Flash ROM, including the menu and the flasher. An empty cartridge will cause the computer to lock up during the boot process. See the section "If "The!Cart" does not start anymore after flashing" for the required steps. The first flash process will again erase all blocks (16 banks are one block) to initialize the flash, even though the banks may have been empty already.
- You have a "Flash MegaCart 4 MB" cartridge like "Street Fighter II", in your workbook, but it does not start on The!Cart.
Make sure you have the latest CPLD logic update. See CPLD Logic Updates.
For testing, if your cartridge and the flasher work correctly, several test workbooks are available for download here. If the computer does not even start with the cartridge inserted, you can try holding down the "OPTION" key during power-on to bypass the cartridge. Then, load the flasher program from the disk and flash the cartridge again.
Related Links
Compatibility Patches
This is a list of patches for programs that don't work out of the box with newer or non-standard Operating Systems or with the ATR loader of "The!Cart". For them, you can adapt the default parameters determined by "The!Cart" Studio. Just enter the solution listed in the "Parameters" column of the respective workbook entry to patch the files during the export. Since the offsets specified here are specific to a given disk image, they may not work on other disk images.
| Program |
File |
Issue |
Solution |
| Amaurote 128 (130 XE) |
GAME403.ATR |
It uses the memory starting at $480 during loading, hence overwriting the ATR loader if it uses that area. |
base=$0500, $011d=siov |
| Bandits |
Bandits (1982)(Sirius Software)[OS-B].atr |
It uses an indirect jump to the disk SIO vector to hide where it takes place. This requires an additional patch location, "$119D1", to be added manually. |
base=$500, $45=dskinv, $1617=dskinv, $208f=dskinv, $5326=dskinv, $0105c9=dskinv, $01065e=dskinv, $119D1=dskinv |
| Bounty Bob Str. Back! |
GAME049.ATR |
It uses the wrong PORTB value, $8f, when activating the OS ROM, causing extended RAM to become active in extended machines. The data from the empty extended RAM is copied under the OS, and when pressing RESET, the blank data is copied over the actual program. Though the program seems to start correctly, it'll break later. |
base=$0400, $011d=siov, $122ed=$ff, $12318=$fe |
| M.U.L.E. |
GAMES067.ATR |
The crack intro uses the normally unused stack area at $114 and page 4 at $400. Therefore, the ATR loader's base address must be set to a different value. |
base=$0600, $011d=siov, $016a01=$ae, $016a02=selected_item_number, $016a04=$4c, $016a05=$8b, $016a06=$09 |
| Popeye |
GAME009.ATR |
It uses an illegal entry point to OS-B, so it doesn't work on a standard Atari XL. |
base=$0400, $011d=siov, $1101a=$ea, $1101b=$ea, $1101c=$ea |
Change History
2026
2026-03-28
- Added "Flash MegaCart 4 MB" (cartridge type 63) as supported The!Cart mode 37. This mode is required to run cartridges like Street Fighter II. To use it, you also need to have the latest CPLD logic update.
- Updated the sections for the CPLD logic updates and the troubleshooting.
- Fixed the start-bank computation for cartridges with 16k bank size.
- Updated the "The!Cart" flasher software to version 2026-03-22, which supports the new The!Cart mode 37 and has the latest high-speed SIO and MyPicoDos.
2025
2025-01-12
- Updated external links in the documentation.
2024
2024-06-03
- Updated external links in the documentation.
2023
2023-08-31
- Changed the handling of the cursor keys to require "CONTROL".Hence, you can now enter "+-=*" as characters in the search field.
2023-08-28
- Added native 64-bit versions for Windows, macOS (Intel and ARM), and Linux based on my new toolset.
- Reworked all English and German text documentation again for correctness and readability using Grammarly.
2023-05-29
- Reworked all English and German text documentation for correctness and readability.
- Fixed the minimum JRE version message to display "1.8" instead of "1.6".
2023-05-21
- Added content types for the new cartridge types: "71 - Super Cart 64 KB 5200 cartridge", "72 - Super Cart 128 KB 5200 cartridge", "73 - Super Cart 256 KB 5200 cartridge", "74 - Super Cart 512 KB 5200 cartridge", "75 - Atarimax 1 MB Flash cartridge". These ".car" types are now recognized by "The!Cart Studio" for completeness. Please note that the "The!Cart" hardware cannot emulate these types.
- Added menu support and download link for the 2022 version of the Bootmanager menu by Mike Langer. New ATR images with this menu can also be added as "Multiple Entries", just as it was possible with the 1996 version.
- Added the initialization of the stack pointer to SP=$ff before starting an entry. This increases compatibility.
- Added the initialization of the diagnostic cart flag in Atari 5200 cartridges to $ff in the sample ROM generator. This causes the Atari 5200 to skip the splash screen.
- Fixed the initialization of the zero page in the generated sample ROMs to prevent crashes.
- Fixed typos, links, and font size in the HTML help documentation.
- Added Google Translate link to translate the English version on the fly into German.
- Added a viewport specification to the HTML help documentation for correct scaling on mobile devices.
2022
2020-08-13
- Workbook entries now have an additional "Comment" column beside the "Title" column. The column is hidden by default and can be shown via the context menu on the table header. Contrary to the title, the comment is only used in "The!Cart Studio" and has no length or character restrictions.
- During the export of Maxflash and MegaCart entries, the title of the menu entry is no longer replaced by the version of the MaxFlash menu (e.g., "MaxflashMenu-$1f47-$ffffffff"). Instead, the title is now kept, and the version information is stored as a comment in the new column "Comment" (e.g., "comment=MaxflashMenu-$1f47-$ffffffff"). This way, the entries keep their original or user-defined title.
- Added the initialization of PMBASE ($d407) to $00 before starting the selected entry to all loaders. This fixes player missile display issues for programs that rely on running on a freshly booted system. For example, the "Moon Patrol Redux" on "GAMES449.atr".
- The ATR loader now initializes DBUFLO/DBUGHI ($304/$305) again to $400 after the boot sequence. This fixes loading issues with programs that rely on this OS-specific default. For example, "Sexy Six Data disk #1(19xx)(Sikor Soft)(PL).atr".
2020-05-21
- Fixed ArrayIndexOutOfBoundsException when adding an ATR disk image with a partial match for DISKINV/SIOV at the end of the file.
- Fixed XEX detection for files where the last segment is a single byte.
- The text of the message I425 has been improved: Export the '{0}' project of this ROM using the latest program version of '{0}' and import the ROM into this workbook again." Then, you can start these entries directly.
2020-01-01
- The long-pending feature of marking an entry as a favorite works now. If you set the favorite indicator for an entry, the initial list of entries in the extended menu only shows the favorites for the active genre. This way, you can use the joystick or cursor keys to select from the restricted list of entries. When you start typing a search term, the favorite indicator becomes irrelevant, and all entries are searched for the search term.
- The search, which was broken in version 2019-12-24, is working again.
- The XEX loader now handles files without a RUNAD segment and files where the RUNAD segment is not the last correctly.
- The XEX loader now clears the cold start flag (COLDST, $244), as a DOS would. This way, programs that start by changing the DOS vectors and jumping to a warm start can start correctly.
- The wait cursor is displayed while saving the files created via "File / Export" to indicate the program is still busy.
2019
2019-12-24
- The tabbed display for the genres now only scrolls if the selected genre does not fit on the screen. This is what you'd expect from a tabbed visualization.
- The XEX loader now sets the
BOOT? flag to $01, as a DOS would. This fixes problems with programs that rely on the XEX being loaded from a disk.
2019-11-26
- The columns "Title", "Genre", "File Path", and "File Name" are now sorted case-insensitively.
- Fixed file exception when adding "Goonies.atr", "ElektraGlide.atr", "Rampage.atr", and other ATR files.
2019-11-04
- The content type "Executable File" is automatically set when executable files (COM, EXE, XEX) with a valid file structure are added.
- A new content type, "SAP Music File", has been added and is set automatically when Slight Atari Player files (SAP) with a valid file structure are added. These files will be supported directly by the menu in the future.
2019-10-28
- Executable files (COM, EXE, XEX) can now be added directly to the workbook. Previously, they had to be copied to an ATR disk image or be included in an Atarimax ROM. The corresponding sections in the documentation have been updated. For now, only files with a valid RUNADR ($2e0) segment will start, just like under DOS 2.5.
- Bootmanager by Mike Langer is now included in the "The!Cart Studio" download and online help. While adding executable files directly to the workbook is possible, adding them to an ATR disk image with the boot manager first, then adding the ATR disk image, has advantages. ATR disk images work with sectors of 128 or 256 bytes. So if multiple files are copied to a single disk, at most 127 or 255 bytes of space is wasted. If you add executable files directly, you waste 8191 bytes of space per file in the worst case.
- Besides the HELP key, the ATARI/INVERSE key also displays a built-in help menu that explains all controls. This solves the problem of no HELP key on the Atari 400 and the Atari 800.
- If the application detects that a new version is available, it prompts the user if the download should be performed. If the user confirms downloading the latest version, the current application instance is automatically closed so its files can be replaced.
2019-08-29
- The default file name for the "Export To ATR Programming Images (16MB)" is now fixed to "Part.atr". The resulting export files are then named "Part_1.atr" to "Part_9.atr". This ensures that devices like SIO2USB and SIO2SD, which only display "8.3" file names, can display the full file name, preventing users from mixing up the parts.
2019-07-20
- The values for the reduced keyboard delay and increased repeat speed are now set only based on the PAL/NTSC type of the machine. This fixes the unusable menu issue because the rate was too high when the OS had already set non-standard speeds.
2019-06-01
- The boot sequence now correctly disables and locks "The!Cart" if SELECT was pressed. This fixes the problem that "The!Ramdisk" driver sees "The!Cart" even though it is unusable.
- TheCartStudio.exe can now be associated with the ".tcw" file extension on Windows. This way, you can have file type icons and open the workbook file via a double click from Windows Explorer or by dragging the workbook file on the executable or its link.
2019-03-02
- New 48x48 icon for Windows, macOS, and Java.
2018
2018-08-05
- Section "If "The!Cart" does not start anymore after flashing" added in this documentation.
2018-07-17
- Titles defaulted from the file name are correct if the file name contains multiple period characters.
- The ATR loader no longer sets a temporary blank display list to prevent flickering if the screen DMA is disabled via SDMCTL ($22F). This prevents the screen from remaining black after loading when the program directly writes to DLISTL/DLISTH ($D402/$D403). This is the case for Bandits.
2018-06-17
- The preview option ("CTRL-T") has been enhanced. When no valid path to an emulator is configured in the global options, and no default application for ".car" files is registered, a file chooser dialog now prompts for selecting the emulator executable to use. If a valid executable is chosen, it is also saved in the global options. The JDK has a bug, so detection does not always work. See JDK-8204537. You can work around this by manually entering the path in the options.
- The ATR loader now clears the memory locations from $80 to $ff and from the end of the loader (around $2000) to $9fff before the boot process. This fixes incompatibilities with programs that assume these locations to be zero, such as Turbo-Basic XL 1.4.
2018-06-06
- Fixed a bug added in the 2018-05-05 version that can prevent entries from being added when they are in the cartridge database.
- If the title derived from the file name and the title in the cartridge database are equal, no confirmation dialog is displayed anymore.
- The content type "XEGS 32 KB" is now correctly mapped to the "The!Cart" mode for "XEGS 32 KB" instead of "Switchable XEGS 32 KB" in the extended menu. With this, cartridges that use bank numbers with bit 7 set now work correctly, for example, "Castle Crisis".
- Usage of the SHIFT modifier is now the same in the expert and extended menus. When starting an entry with SHIFT, i.e., FIRE+SHIFT, RETURN+SHIFT, or RETURN+SHIFT+CONTROL, the configuration registers of "The!Cart" remain unlocked. Using the CONTROL modifier in addition, i.e., RETURN+CONTROL or RETURN+SHIFT+CONTROL, indicates that the inner menu of the cartridge containing the menu entry is started instead of starting the menu entry directly. Note that FIRE+CONTROL alone cannot be detected on the Atari because POKEY works the way it does.
- Built-in MyPicoDOS and flasher software from hias updated from version 4.05T (2014-04-07) to 4.06T (2017-09-24);
- Added a ".CAR" file loader to load cartridge images up to 512k from the disk into the "The!Cart" RAM without flashing them. It is handy for fast test cycles during development.
- Attract mode is now disabled when using joystick navigation.
- Added directory and drive switching using a joystick.
- Bugfix: Don't disable high-speed SIO if reading a directory fails.
- The generated unit test cartridges now contain more details, including the mode "The!Cart" uses for emulation. In addition, the VBI is still active, so the cartridge can be frozen using TurboFreezer to analyze problems on the actual hardware.
- Import conversion for the Williams 32 KB ROM is now more robust and always generates a new filename for the converted file.
- File and conversion errors occurring while adding new entries are now reported correctly in the status bar.
2018-05-05
- Import of Maxflash Programming ATRs now automatically converts the ".ATR" file to a ".CAR" file only if the flash target type of the workbook supports the Atarimax bank switching scheme.
- Import of Williams 32 KB ".ROM" and ".CAR" files now automatically converts the file to a Williams 64 KB".CAR" file in case only the Williams 64 KB bank switching scheme is supported by the flash target type of the workbook.
- The new Atari800 cartridge types and corresponding content types for "Atrax 128 KB" (68), "aDawliah 32 KB" (69), and "aDawliah 64 KB" (70) have been added to the cartridge detection and unit test generation. Note that they are not supported by "The!Cart" itself. If you have used the supported "Atarax 128" (17) mode in your existing workbooks, you have to re-classify the corresponding entries now as "Decoded Atarax 128" (17). This is an incompatible change, but I want to be 100% in sync with Atari800 and its definitions.
- The cartridge database has been updated to Kr0tkis' version from 2018-04-24. Now, it contains 839 known titles instead of 737, and 807 known content types instead of 717.
- If a matching entry in the cartridge database is found when adding a file, the user is prompted to decide if the proposed title from the database should be used.
- The About dialog now displays the number of supported content types.
2017
2017-10-30
- Documentation updated with details for running the native app on macOS.
2017-06-21
- Holding OPTION while pressing RESET on the Atari also turns off the cartridge if the extended menu is used. If the cartridge contains the extended menu, holding SELECT while pressing RESET on the Atari starts the simple menu. This allows for starting the flasher and updating the extended menu if it does not work correctly. Note: The function of these two keys was swapped in later versions.
2015
2015-09-20
- The "Multiple Entries" feature is now more reliable for corrupted Atarimax menus and can handle menus with more than 70 entries correctly. "Maxflash Studio only reserves about 2000 bytes for the title texts. Title texts are stored as variable-length strings. Typically, the ROM space on the cartridge runs out for the workbook data before the title space runs out for the titles. However, due to a missing warning in Maxflash Studio, the title space can overwrite the content space if many long titles are used. The "The! Cart Studio" now tries to detect that situation and stops at the last correct entry. See Maxflash Studio Menu corrupted when using >70 entries.
2015-08-08
- Typing in the extended menu creates a regular key click via GTIA.
- A bug during the search that was introduced in the previous version is fixed again.
2015-08-07 - Fujiama 2015 Edition
- "TheCartStudio.app" for macOS users now works correctly, allowing them to start the application directly from the Finder.
- The new modifier key, "CONTROL", is evaluated when starting an entry to turn off the default configuration lock. This can be useful when using software built to access the "The!Cart" cartridge in native mode, for example, RAM disk drivers. See Extended Menu for details. Note: This was changed to "SHIFT" in newer versions.
- The new section, Trouble Shooting, was added to the documentation. It also includes a download link to an archive containing test workbooks for cartridges of different sizes and all supported cartridge types.
- Description of the flashing process for "The!Cart" added to the section Programming Flash Cartridges of the documentation.
2015-04-26
- The download now contains a "TheCartStudio.exe" for Windows users. This wrapper program has proper icons, a version and location test for the Java Runtime, and the required Java parameters to ensure enough heap memory is available.
- The download now contains a "TheCartStudio.sh" for Linux users. This script provides Java with the required parameters to ensure enough heap memory is available.
- The download now contains a "TheCartStudio.app" for macOS users. This one is still very experimental and hasn't been tested yet, as I don't own a macOS machine. But I wanted to get this version out now.
- Online help has been revised. New sections and diagrams now explain the workflow and the process of creating and flashing workbooks. Also, the different options to add files directly or via Maxflash Studio and MegaCart Studio are now described.
- The selected line in the extended menu now uses black text and more constant and darker flashing. This reduces bending and artifacts on the CRT screen.
- Player missile graphics of the extended menu are now disabled correctly before an entry is started. That was an issue, for example, with Flop Magazine 56 Intro.
- An exception that occurred with ATR files that do not have a boot manager menu, nor are DOS 2.5 disks, is fixed.
- New Atari software version 2014-04-07 included. It includes a fix for the CAR or MyPicoDOS when loading OSS modules.
- The "-createSampleFiles" command now correctly creates separate folders "ROM-Correct", "ROM-Size-Too-Small", and "ROM-Size-Too-Large".
- Console output for error messages is now routed to "System.err", so the command line can adequately distinguish between information and error messages.
2014
2014-09-25
- The last entry from Bootmanager by Mike Langer disks is now visible in the extended menu. Thanks to Frank for pointing out the bug.
- New cartridge type "67 - XEGS 64 KB cartridge (banks 8-15)" added to the list of recognized cartridge and content types for completeness.
2014-09-24
- Bootable ATRs without "DOS 2.x" or "MYDOS" are now correctly recognized again. They had worked before and became broken with the support for the Bootmanager by Mike Langer ATR disk images.
- The new menu entry "Tools/Preview" allows for a testing preview of the complete cartridge export and its menu in an emulator, just as in the Maxflash Studio. The workbook is exported as a ".car" file with a fixed name into the user's temporary folder for the preview. A previously existing preview is overwritten automatically. If no path to an emulator executable is configured in the options, "The!Cart Studio" tries to open the ."car" file with the associated default program of the operating system. If that fails, it will ask you to enter the full path to the emulator, for example, "Altirra.exe" or "atari800.exe", in the options.
- The modifier key for menu entries should now be "Command" instead of "Control" on macOS.
- The bank color buttons are now correctly displayed on Windows XP.
- The "Check for Updates during Start" setting in the options is now saved correctly when the program is closed.
2014-09-22
- The export now generates a ".txt" index file with the title and origin of all menu entries. So, you can use the file system search of your operating system's function to find games in exports. The index file also contains detailed information about the inner menu entries of workbook entries with the "Multiple Entries" setting. For example, "Amaurote 128 (130 XE)" will be listed for the workbook entry with the title "GAMES403" stored in "GAMES403.ATR".
- The resident part of the SIO simulation that must be present after booting has been reduced from 231 to 148 bytes. This makes it possible to use the stack area with "base=$100" also. Since that part of the stack will be unused in most cases, it has become the new default base address. Yet some programs may use that area, for example, during unpacking, so you'll have to try other values in case it doesn't work.
- The ATR analysis now patches DOS disks correctly in case the " at sector four, but on other parts of the disk. Example: "
Asteroids.atr" by Norbert Kehrer
- In the new appendix, Compatibility Patches, you can find a list of known parameter combinations for programs that don't work with the default parameters. This includes fixes for OS-B-only games (Popeye) or file versions with plain bugs (Bounty Bob).
- Pressing RETURN to start the selected entry correctly starts the menu entry even if the search is still active. Before, RETURN was incorrectly interpreted as ESC. As a result, the simple menu was started instead of a menu entry.
- Menu entries from double-density Bootmanager by Mike Langer disks with more than nine entries (i.e., more than one directory sector) now appear correctly in the extended menu. Example: "GAMES009.ATR".
- The documentation has been extended with the description of starting Java with enough memory to export a large workbook. The About dialog now displays the amount of memory available in Java. Errors that occur during export due to insufficient memory are not displayed; instead, they are reported in the status bar. This was a problem on macOS 10.9, where the default Java heap size was 128 MB on some machines.
- The new parameter "$123=SELECTEDITEMNUMBER" can patch the menu code of ATR images to load the correct menu item. For Bootmanager by Mike Langer disks, this is already done automatically now. So you can start all of them from the extended menu without bothering with the actual Bootmanager by Mike Langer menu.
2014-09-16
- "The!Cart Studio" automatically checks if a newer version is available on the website during startup. A dialog box appears if a more recent version is available, and the download can be triggered by pressing "Yes". For those with a slow internet connection or who don't like automatic updates, the check can be turned off in the options. You can then use the "About" dialog to display the local version and the version available on the website.
- The analysis of the ATR for SIO patching has been improved. For disks that contain a known DOS (DOS 2.0S, DOS 2.5, MyDOS) and its "DOS.SYS" file, only the sectors that belong to that file are patched by default. For disks that contain the Bootmanager by Mike Langer, only the sectors of the Bootmanager are patched. For all other disks, the entire disk is scanned for all SIO usages. That may result in some false positives, which you must manually remove from the parameters. If you added ATR files to a workbook before and did not manually modify the parameters, you should add those files again. This will set the parameter to the new default, reducing the risk of applying the wrong patch.
- Patches specified in the "Parameters" column for ATR files can also be used for direct patching and pokes. You can specify a patch or poke as "$1234=$56" to set the byte at offset "$1234" in the disk image content to "$56" during the export. For example to make "Popeye" work on OS-C/XL machines you can specify "base=$0400, $011d=siov, $1101a=$ea, $1101b=$ea, $1101c=$ea" as parameters for the "GAME009.ATR" from Homesoft.
- The ATR loader now correctly clears the RAM before the boot process. Before, the RAM was unintentionally filled with a pattern. This resulted in graphics garbage in some programs that do not properly initialize RAM, such as Master of the Lamps.
2014-09-11
- Detailed descriptions of all columns on the "Entries" tab and of the "Multiple Entries" setting for the "Display mode" have been added to the Adding Entries section.
- "Multiple Entries" is now also supported for two disk-based menus. Disks that contain the "Bootmanager" by Mike Langer or "MyPicoDOS" by Matthias Reichl are now supported. The long file names maintained in these menus will be listed in the extended menu and can be used for searching. You can find the enormous archive of disk images that use "Bootmanager" on the Homesoft website. As a test, all currently present 405 disk images with 2477 games have been added successfully and appear correctly in the extended menu.
- Memory organization of the extended menu optimized. It works correctly now on an Atari 400 with only 16k of RAM. Isn't that cool with 128 MB of ROM? The result list is now automatically limited by the available RAM on the Atari. On a 16k Atari, there is space for 512 entries in the result. On a 48k Atari, there is space for 12,800 entries in the result.
- Link to hias' website fixed in the documentation.
2014-08-04
- The extended menu now also works with "The!Cart" cartridges with 32 MB and 64 MB.
2014-07-18
- The download link and version number are now correct in the About dialog.
- Content type for CAR files of type "The!Cart 64MB" is not detected correctly.
2014-07-12
- ATR simulation now also works on NTSC machines. Some images ending in a PAL computer lockup will also work now.
- ATR loading speed has been increased again by 50% for the cases where the destination address does not overlap with the ROM area.
- Sorting tables by multiple columns is now supported. Clicking on the column header with SHIFT or CONTROL held down extends the sort order by appending this column. This way, you can sort by genre and title, for example. Clicking a column header without pressing SHIFT or CONTROL resets the sort order to that single column.
2014-07-02
2014-04-03
- RAM is cleared before starting inner entries from Atarimax or MegaCart compilations. This will fix artifacts in programs that rely on this, for example, Spy's Demise.
2014-03-18
- ATR loader now correctly sets "DSTATS=1", making it more compatible with some disks.
2014-03-02
- The filtering via genres is now working in the extended menu. Use a joystick or the cursor left and right to step through the genres. The visualization of the selected genre isn't yet how I want it, but it works for now.
- The HELP key now displays a built-in help menu that explains all controls.
- Initialization error in the direct start for MegaCart's inner menu entries fixed (DLI vectors, BASIC not off after warm start).
- Some cartridges, like Asteroids, have the property that pressing the RESET button on "The!Cart" sometimes brings you to the extended menu by accident. This is the case simply because they use the same memory area, and pressing the button swaps the code. This can lead to garbage on the screen and a non-working menu. Now, the menu detects that the RESET button of "The!Cart" is still pressed during initialization (which is usually not the case). It then performs a cold start to ensure proper initialization once the button is released.
- Keyboard definitions are now included directly in the extended menu, so it works correctly if an "OldRunner" OS is active.
- TAB - Toggle the details display of the selected entry between readable and technical information.
2014-02-27
- Display type "Multiple Entries" is now also supported for an additional older version of the Maxflash Studio menu. For the very first version, this also includes the direct start. It looks like there were as many releases of that software as for "The!Cart Studio".
- Direct start of MegaCart's inner menu entries from the extended menu is supported for the latest version of the MegaCart Studio menu. Thanks to Bernd for his support in making this possible so quickly.
- Holding down "SHIFT" when starting an entry from an inner menu turns off the immediate start and takes you to the inner menu instead.
- New Atari software version 2014-02-24 included. It includes fixes for SPI EEPROM handling, which stores the configuration of the simple menu.
2014-02-22
- Display type "Multiple Entries" is now also supported for seven additional older versions of the Maxflash Studio menu. Those were the ones with "<A>,<B>,<C>" lists. So you can see and search the entries from the contained menu directly in the extended menu.
- Direct start of Atarimax's inner menu entries from the extended menu is supported for the latest version of the Maxflash Studio menu.
- First - very experimental - support for ATR loading based on binary translation. Only non-encrypted single- or enhanced-density disks may work. This ATR loader supports loading programs that use the RAM under the OS. You are better off putting all other ATR stuff into a Maxflash or MegaCart Studio image.
- Sort order in the extended menu is now case insensitive.
- New Atari software version 2014-02-17 included for improved high-speed handling.
- Timing bugs fixed that could cause the menu or cart to freeze during boot or ROM start, for example, Asteroids.
2014-02-16
- Display type "Multiple Entries" is now also supported for the content types "MegaCart 512 K" and "MegaCart 2 MB", and two older versions of the Maxflash Studio menu. So you can see and search the entries from the contained menu directly in the extended menu.
- Entries are automatically sorted by title when you save a workbook, so they are sorted by default when you open the workbook the next time. Clicking on the column header, of course, changes the display sorting just like before.
- The recurring lockup with a black screen introduced in the last version should be solved now. After 28 years of Atari programming, I discovered that display list interrupts are triggered, even if the display list DMA and the screen are switched off. This caused the VBI not to update the shadow register to enable DMA, because it assumed that if the VBI interrupts an interrupt, it is probably the serial I/O. But this time, it wasn't. Fortunately, I have my Turbo Freezer to find what is different on the actual machine, because the issue never occurs in the emulator. Phew.
2014-02-13
- Search speed improved from 25s to 9s for a full search in 16,000 entries with short names. When the search process is finished, the elapsed time in frames is displayed.
- Scroll speed and acceleration adapted.
- Cursor keys now control the scrolling without pressing "CONTROL". This also means these characters are no longer available for typing in, which should not be a problem.
- Clearing of result lines when restricting the result now works correctly.
- For Atarimax 128K/1 MB cartridges created with the recent Maxflash Studio, the display type "Multiple Entries" is now supported. Entries in the Atarimax menu will also appear in the extended menu search. Selecting such an entry starts the Atarimax menu it comes from. Direct start support will be added later. Due to a potential bug in Maxflash Studio, only the first 70 entries in the Atarimax menu are accepted, on the safe side.
- New flash target types "The!Cart 32 MB" and "The!Cart 64 MB" were added to the workbook options because these sizes are requested and shipped now.
- New cartridge types "65 - The!Cart 32 MB" and "66 - The!Cart 64 MB" were added as they are because these sizes are requested and shipped now and are also supported by Atari800.
- Definition of initial banks fixed. Now all cartridge types use initial bank 0 (again) except for CARTRIDGE_OSS_034M_16 (bank 1), CARTRIDGE_ATMAX_1024 (bank 127), and CARTRIDGE_MEGA_4096 (bank 254).
- New Atari software version 2014-02-09 included. This fixes the problem that SDX64, Express, and Diamond cartridges were not starting correctly due to an incorrect initial bank register (7 instead of 0). It also adds a new option to the flasher when the cartridge is started. You can now enter the default (extended menu) or, if you want, enter the simple menu directly. When entering the simple menu this way, the auto-start feature is disabled, so you don't start with the wrong bank after flashing new content.
- The command-line option to generate sample cartridge files now generates the correct files for "Megacart 2MB" and all Atari 5200 cartridge types.
2014-01-23
- The first version of Google-like search and scrolling in the result list of the "Extended Menu" is now implemented.
- The workbook options now allow all menus if the flash module type is "user-defined". The "Simple Menu" and "Extended Menu" will, of course, only work if the actual cartridge later is a "The!Cart" cartridge.
2014-01-17
- The title and genre columns were not editable in the version from 2014-01-15 because introducing the new data type for sorting disabled the default editor. This is fixed again now.
2014-01-15
- New Atari Software version 2014-01-15 included.
- Fixed several flasher issues:
- only ask for a disk when data will be read from it
- added retry option on I/O errors
- Don't print empty bank numbers.
- In non-incremental flashing mode, program the checksum block after data has been programmed (like in incremental flashing mode)
- Display the software version in "The!Cart" simple menu
- Check the SHIFT key (to keep central config registers enabled) when disabling "The!Cart" with ESC from the simple menu and when OPTION is pressed during boot
- The cartridge database was broken after refactoring and is now working again.
- The first version of output for entry number, "The!Cart" flash module type, start bank number, and boot bank number in the status bar of the extended menu.
- Columns with ATASCII strings (titles, genres) are now sorted with binary order, not locale-dependent collation. This means "Atarimax 1 MB" now appears before "Atarimax 128 KB" in both "The!Cart Studio" and the menu.
- A new flash target type, "Turbo Freezer 2005 448 KB", was added, which can be used to create ".BIN" files with 56 banks and 8k, 16k, OSS, and SDX bank switching.
- Flash target type "User Defined" now allows all content types so that you can create arbitrary image files with it.
2014-01-14
- The first version of "Extended Menu" was implemented. The first 20 entries of the menu are displayed. You can use the cursor keys plus Return, or the joystick on port 1 with the fire button, to select. Press ESC to enter the simple menu.
- The cartridge type for "64 - MegaCart 2 MB" is fixed. It was 63 instead of 64, so the ".CAR" files were incorrectly recognized.
2013-12-28
- Mapping to "The!Cart" mode $22 fixed for cartridge type "61 - MegaMax 2 MB".
- New cartridge type "64 - MegaCart 2 MB" and mapping to "The!Cart" mode $2F added.
2013
2013-12-26
- About dialog now displays if a newer version of "The!Cart Studio" is available on the website.
- The Genre column now has a sorted drop-down selection for the genres defined in the workbook options.
- Coloring of bank fixed for entries that span multiple rows.
2013-12-18
- Text and help of the menu entry for "Export as ATR" changed into "Export as ATR for AspeQt" to be more explicit about the different export types of ATRs.
- Action "Cancel" now keeps the program open when closing the program via the close button.
- Changes to the "Genre" column are now detected correctly when closing the program with unsaved changes.
2013-12-13
- The new file selection dialog is as close as possible to the native file selection dialog of the underlying operating system now. This enables proper browsing, context menus, and more.
- New algorithm to position the blocks for the banks on the "Banks" tab. The size and position of the blocks now adapt better to the available window size. The 16,384 blocks can be adequately seen also in 1024x768 resolution.
- New color schema for banks, including separate colors for user space.
2013-12-12
- All relevant Atari characters are now allowed in titles: ABCDEFGHIJKLMNOPQRSTUVWXYZabcdefghijklmnopqrstuvwxyz0123456789!"#$%&'()*+,-./:;<=>?@[\\]^_
- Titles, for example, when derived from the file name, are now automatically truncated to the allowed 40 characters.
- The bank's assignment problem when using the "Overwrite" option for equally named files has been fixed. It could cause overlapping bank assignments and corrupted bank output.
- Error message for ".CAR" files with incorrect content size fixed.
2013-12-11
- Import of "ATR Programming Images" for "Atarimax 1 MB" and "Atarimax 128 KB" extended. With two different extraction algorithms, it can now recognize nine versions of the Maxflash software (2003-11-03, 2003-05-29, 2004-08-25, 2005-04-09, 2009-08-15, 2011-10-03, 2012-04-07). It was tested against 99 other "ATR Programming Images" and successfully created working "CAR Images" for them.
- New cartridge types "CARTRIDGE_MEGAMAX_2048=MegaMax 2 MB" and "CARTRIDGE_MEGA_4096=Flash MegaCart 4 MB" were added to the recognized content types following the new Atari800 definition. Please note that this is only for completing the Studio. Only the MegaMax 2 MB can be emulated by "The!Cart" itself.
- A new flash module type, "Flash MegaCart 4 MB", was added to the "Flash Module" presets in the workbook options. Please note that this is just a preset; no flasher is included.
- The workbook options' new "Cartridge Type" field allows explicit cartridge type specification for user-defined flash module types. This cartridge type is used when the workbook is exported as a ".CAR" cartridge image.
- The size of user space is now automatically rounded to a multiple of the flash block size, i.e., to 64 KB for the flash target types "Atarimax 128 KB/ 1 MB" and "Flash MegaCart 4 MB" and to 128 KB for "The!Cart 128 MB".
- The external software in "
cartmenu.rom" is now found if the folder path contains spaces or other special characters.
2013-12-06
- Import of "ATR Programming Images" for "Atarimax 1 MB" and "Atarimax 128 KB" fixed, so it also works with cartridges that are not full, i.e., where the ATR is smaller.
2013-12-05
- 1 MB Atarimax cartridge images are now correctly defaulted to content type "Atarimax 1 MB" instead of "Atarimax 128 KB.
- Section "Printing Workbooks" added to online help.
2013-12-04
- Existing collections for 128 KB or 1 MB Maxflash cartridges are often only available as "ATR Programming Image" but not as "CAR" cartridge images. Therefore, a Maxflash Studio ATR programming images conversion to "CAR" cartridge images has been added. This way, you can even test the collection directly in an emulator.
- Description of supported file formats (CAR/BIN/CAR/ATR/EXE) and their usage added to the online help.
2013-12-02
- The window state "normal/maximized" is now also saved, and the default window position and size are those that the user has set before maximizing/minimizing the main window.
- The program now also starts and works correctly if the folder path of "TheCartStudio.jar" contains a folder with a name that ends with an exclamation mark "!".
- The cartridge database has been cleaned up. Additional characters like "+-*/=?" are now allowed in titles. Title suggestions with more than 40 characters from the cartridge database are automatically shortened.
2013-12-01
- New Atari Software version 2013-11-30 included. External software is now also found even after the name "TheCart.jar" was manually changed.
- The default bank for user space entries is now the first bank of the user space.
- Table of contents with links added to help.
- Help content is now displayed with the correct small font.
2013-11-26
- A new menu entry, "Edit/Add User Space Entry", was added to define cartridge menu entries for those parts of the flash cartridge in the user space. The user space is part of the flash cartridge that "The!Cart Studio" does not touch, but is flashed directly from the Atari. The user space size can be specified in the workbook options.
2013-11-25
- New Atari Software version 2013-11-03 included. This version supports delayed autorun for the last used ROM. In addition, a newer version of the "
cartmenu.rom" can be manually placed in the same folder as "TheCartStudio.jar". It will be loaded automatically, then. Whether the built-in or the external software is used and which version it has is displayed in the "About" dialog.
2013-11-04
- The new menu entry "Tools/Options" allows the selection of the display language of "The!Cart Studio". Possible values are "Automatic", "English", and "German".